Please play with this picture

vftt.org

Help Support vftt.org:

This site may earn a commission from merchant affiliate links, including eBay, Amazon, and others.
Sometimes I like to know about the details of photos. So just in case anyone's interested:

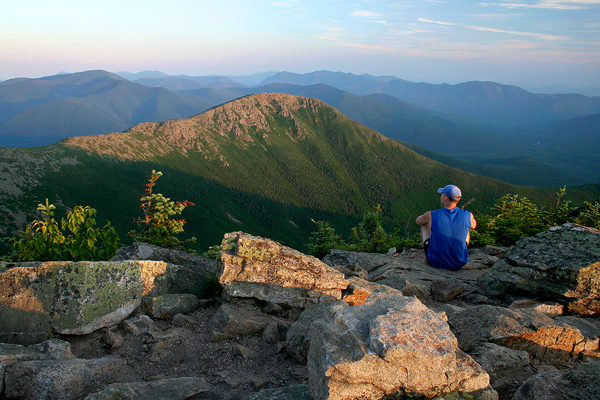
-Taken from West Bond (2 hours alone on summit in July....go figure)
-Digital Rebel XT
-aperture set to f16
-shutter speed = 1/4 second
-ISO 100
-Focal length = 18mm (~28mm effective due to the size of my sensor)
-polarizing filter
-tripod
-auto-release set to 10 seconds to give me time to run over to the rocks, sit down, and stop moving
-setting sun was lighting up the cliffs nicely, so I wanted to meter on and expose for the cliffs. But I didn't want to wash out the sky, which still had a tint of nice color. Didn't mind if some of the foreground shadows got clipped, but didn't want to bleach the sky. So the cliffs aren't as orange as they could be.
-I never want to ruin a photo by including myself in it, but I was alone.....I was all I had for foreground material to give the photo more depth.
-should've shot RAW, but I wasn't shooting RAW then.
-when someone finds a camera with the dynamic range of our eyes/brains, let us all know.

Once again, thanks for all the feedback and editing.
 
-Digital Rebel XT
-aperture set to f16
-shutter speed = 1/4 second
-ISO 100
-Focal length = 18mm (~28mm effective due to the size of my sensor)
FWIW, this information (and more) is available in the EXIF in the JPEG or RAW file. Exiftool is a good tool for accessing this info: http://owl.phy.queensu.ca/~phil/exiftool/

-setting sun was lighting up the cliffs nicely, so I wanted to meter on and expose for the cliffs. But I didn't want to wash out the sky, which still had a tint of nice color. Didn't mind if some of the foreground shadows got clipped, but didn't want to bleach the sky. So the cliffs aren't as orange as they could be.
In a case like this, it is often a good idea to bracket the exposure to make sure you get a good one. The camera display (particularly the histogram) can be helpful, but the small size of the on-camera display can be a problem. And, of course, RAW has a greater dynamic range than does JPEG, so you may be able to recover more from a RAW file than a JPEG.

Another issue is the white balance (compensation for the color of the incoming light). It can have a significant effect on the final colors in the image. The camera makes its best guess, but it can be wrong. Ideally, you can take a picture of a white or neutral gray object in the same lighting as the subject and use it to get the correct balance. However, in an image such as this one, different parts of the scene will have different colored illumination (which is part of the whole reason for such a picture).

-I never want to ruin a photo by including myself in it, but I was alone.....I was all I had for foreground material to give the photo more depth.
I'm not much for putting people in my scenery pictures, but in this case I think it adds.

-should've shot RAW, but I wasn't shooting RAW then.
Just part of the learning process...

You are probably aware that the XT can save both RAW and JPEG. For ordinary pictures I often just shoot JPEG, but if I suspect that I might need RAW I shoot both and select back at home.

-when someone finds a camera with the dynamic range of our eyes/brains, let us all know.
Don't hold your breath--the eye cheats. You change the effective exposure as you look at different parts of a scene.

Once again, thanks for all the feedback and editing.
Hope the side issue of the need for 16-bit processing wasn't too distracting...

Doug
 
Last edited:
... Hope the side issue of the need for 16-bit processing wasn't too distracting...

Quite frankly, it was, at least from my perspective.

In cases like this I generally prefer a straightforward procedural discussion of how to get from Point A to Point B as a practical matter than a lot of what I consider technobabble dealing with esoteric fine points of the underlying technology. Call me "results oriented."

Billy's description of lighting conditions, filtration and exposure was of interest and comprehensible. I found the description of tweaks performed by grouseking, Tim and Kevin likewise informative and interesting. The rest of it left me feeling like I was on a long bushwhack without a compass.

G.
 
I'm late to the party, but felt that I could add one piece of info. All editing done in photoshop elements II

Everyone is dead on that the image, as shot, was under exposed. Fixing that tends to introduce noise and degrade image quality, but you aren't putting this on a billboard, you want a shot that mirrors what you remember seeing.

I almost always do one technique that wasn't mentioned here to make sure that the edits are controlled in all areas. A non-destructive dodge and burn layer allows me to keep an controlled, natural look in all areas by applying some dodging and burning to only some areas.

Note, I applied this layer AFTER my initial leveling (levels) of the picture!

Tutorial here:
http://www.photoshopessentials.com/photo-editing/dodge-burn/

For me, on this shot the priority was to increase light (dodging) on the near, lit mountain, while decreasing light (burning) to retain the highlights in both the sky and lit rocks on the foreground.

I also threw in a slight burned in vignette around the edges to focus the viewer in the middle where the person in the frame is looking (personal style).

Lastly, I applied local saturation boosts using the sponge tool over the sky, person, and middle mountains.

Here's what I got...hopefully a natural look in everyone's eyes...
3722820045_50e6a97953_o.jpg
 
Top