Shooting in the RAW?

vftt.org

Help Support vftt.org:

This site may earn a commission from merchant affiliate links, including eBay, Amazon, and others.

Neil

Well-known member
Joined
Apr 26, 2004
Messages
3,434
Reaction score
487
For some unknown reason I am unable to shoot pictures in RAW mode.

I installed the file : rc140pd_71.exe, installed Canon's software including EOS utility, Digital Photo Professional and for good measure, ZoomBrowser.

In the camera's recording menu I scrolled down and highlighted the Record RAW and JPEG menu choice, set it to on and tried taking and downloading pictures.

All to no avail. I only get jpegs on my computer. No .CR2 files.

This is getting complicated. What am I doing wrong?

( Also, I have ensured that hidden files are unhidden)
 
Neil, are you absolutely sure that you actually changed to RAW mode when you reset your camera? I've had numerous experiences in using camera menus where the changes or options I selected didn't "take" because I managed to miss some detail in the button-pushing sequence.

I know this is one of those "are you sure the thing is plugged in?" responses. But sometimes it helps to check the obvious first.

G.
 
Do you use a card reader to download your photos? If you use it, you should see your .CR2 files in Windows XP or Vista or in Photoshop (if you have the last update for the raw files of the G10)??? Or, you connect the camera to your PC and download it with your Canon software?
Is it the Canon software who cannot read .CR2 files?

I am not a Canon user, I have Nikon products.
 
Last edited:
Problem seems to be solved. I took the camera to the store (one of the advantages over internet shopping).

The instructions in the manual were incomplete.

You have to select RAW via the Function button in shooting mode. What I did was select RAW + Jpeg via the Menu button. (you can shoot RAW only or RAW plus jpeg.)

The guy also said to get the latest update for Photoshop Elements from Adobe's site or I wouldn't be able to open the .CR2 files in PSE.

So Grumpy, it was a "are you sure it's plugged in" type of situation.
 
Neil, glad you got your problem resolved.

By the way, the advice about keeping your Photoshop software updated is right on the money. It helps avoid all sorts of difficulties as you go along.

G.
 
Updating PS was a bit of a nightmare but I finally figured it out.

I took and opened a few pictures in RAW format, experimented with the controls, made some adjustments, etc. and now have to admit (after all the fuss) I don't understand what RAW can do for my pictures that PSE can do.
 
I took and opened a few pictures in RAW format, experimented with the controls, made some adjustments, etc. and now have to admit (after all the fuss) I don't understand what RAW can do for my pictures that PSE can do.
Raw (= the sensor data) is essentially a digital negative and contains all of the information captured by the camera. JPEG is an information lossy format. It is adequate for a final (screen or print) image, but not necessarily as a starting point for processing. For instance, if the dynamic range is very high or the color balance is way out, you might not be able to produce a good final image from a JPEG because of the lost information. Processing from raw gives one the best chance of getting a good final image.

Processing from raw is best done in 16-bit per color per pixel (also called 48 bit = 3x16) images so that information is not lost in processing. Raw images range from about 10 bits in cheap P&Ses to 14 bits in some of the better DSLRs. JPEG is an 8-bit format.

Digital cameras come with internal processing to convert the sensor (raw) data into a JPEG. The manufacturers supply some options in this processing, but you may want to do something else. It is also much easier to try things on your computer than in the camera. With raw images, you can do anything...

FWIW, I often just use the in-camera JPEG files for most "ordinary" images. However, if I think there may be something difficult (eg high dynamic range, exposure difficulties) or that I may want to manually process the image, I'll shoot raw+JPEG.

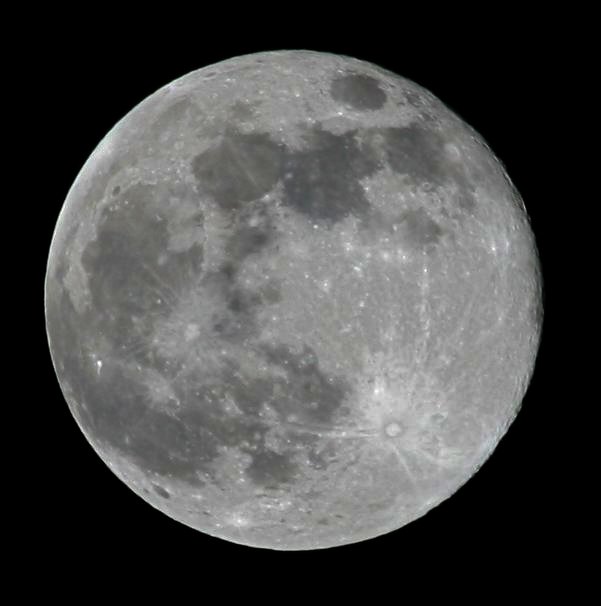
JPEG as it came from the camera:
moon-0649-JPG.jpg

Processed from raw (contrast enhancement and sharpening):
moon-0649-lz.jpg

(Both are 100% crops.)


Doug
 
Last edited:
Neil, as a practical matter, if you are shooting “standard” subjects under “ordinary” conditions and have chosen the right camera settings, both RAW and JPG probably will deliver a high percentage of shots that come in acceptable color, brightness, contrast, etc., right out of the camera. Those shots will require little post-processing either in Camera Raw or Photoshop to tweak them into shape for ordinary uses – sharing with friends, posting on the internet, etc.

RAW is useful when shooting conditions – lighting, especially – get “tricky.” Sunrise and sunset can produce stunningly beautiful but difficult light conditions that may baffle the camera’s processing capability, meaning RAW format is the way to go if you want to preserve your widest range of options. Another tricky condition might be deep shade, as in hiking through an area with dense forest canopy. Mixed light – say, natural daylight or firelight and flash --can be “tricky,” too.

I personally find RAW to be very useful when doing theatrical or nightclub performance photography (where the lighting can be outright bizarre), and night sports (where the lighting can be plain old disgusting). In fact, RAW has become my default image format setting because it helps with the oddball stuff but also does a great job on the more ordinary. I do not use the RAW + JPG option.

As I understand it (and this may or may not be the way it really is) the difference between shooting in RAW and one of the JPG formats is:

  • In RAW, all data coming through the digital camera sensor in accord with the camera control settings (like white balance) are saved to the image file. This yields (relatively) large image files.

  • In JPG, the captured RAW data are processed in and by the camera to some optimized standard correlated with camera settings like white balance, b rightness and contrast. Some data are discarded in the conversion to JPG, yielding (relatively) smaller image files.

  • When you open the image in PS Camera RAW or an equivalent program, you can manually optimize the image to suit your sense of what the scene looked like (or the image of it should look like). You can adjust color temperature, overall tint, white balance, exposure, shadow brightness, highlight brightness, contrast, etc., in the image to suit your taste. Some of these adjustments can be astonishingly large when needed.

  • By comparison, when you open a JPG image in Photoshop, the adjustments you can make are considerably more limited in range.

G.
 
Neil:
Processing images takes some practice and may take a while to learn.

I found some tutorials for you which will hopefully help:
(Some of them are a bit complex--perhaps you can extract a simpler workflow that meets your needs.)

http://www.luminous-landscape.com/tutorials/instant_photoshop.shtml
http://www.luminous-landscape.com/tutorials/workflow1.shtml
http://www.luminous-landscape.com/techniques/process.shtml
http://www.luminous-landscape.com/tutorials/understanding-series/digital-workflow.shtml

Doug
 
Thanks very much for taking the time to reply so thoroughly guys!

Info like that is hard to find. I'll definitely check out those tutorials over the next day or so.

This subject is so frigging vast that there's times when you have to set your camera to Auto and just go take some pictures!
 
It really depends how much time you're willing to spend mucking about with your photos. If you're shooting for a newspaper, I guess you pick a handful of the best shots, process those, and let the editor choose one or two for the article. If you're shooting for a record of a hike you took, you might pick twenty or thirty shots to show to your friends. Processing time can add up in that case.

RAW+JPEG might be a good time-saver. (If the alternative is RAW only, the extra space for the JPEGs isn't really significant.) The in-camera conversion is really quite good, and will be fine for most of your photos. For the tougher shots, you'll always have the RAW.

PS you can still make adjustments to JPEGs, you just may not be able to get back some lost data, especially blown highlights. Here's my attempt at salvaging the JPEG version of that full moon shot with about five minutes of work:
moon-0649-JPG.jpg

Still not as good as the RAW version, but you could get pretty close with some more effort.
 
PS you can still make adjustments to JPEGs, you just may not be able to get back some lost data, especially blown highlights. Here's my attempt at salvaging the JPEG version of that full moon shot with about five minutes of work: <image snipped>
Still not as good as the RAW version, but you could get pretty close with some more effort.
Of course one can post-process a JPEG. If that is all you have, by all means give it a try. Since I shot this one RAW+JPEG, I had the RAW and had no reason to bother with post-processing the JPEG.

Actually, you cannot get back the lost information--you can only display the information that is available in a different manner. This different display can potentially be more pleasing to the eye.


I agree that most of the time the camera JPEG is fine and one can save a lot of time by using them when they are ok.

Doug
 
... This subject is so frigging vast that there's times when you have to set your camera to Auto and just go take some pictures!

That is a very good idea -- a New Year resolution!

If nothing else, it will help you find the limitations of your Auto functions in terms of satisfactory results under various shooting conditions. Once you know about those limitations you know when to switch to modes that will allow you to better cope with whatever conditions prevail at the moment.

G.
 
This subject is so frigging vast that there's times when you have to set your camera to Auto and just go take some pictures!
At least try the P setting... (Allows manual control of some items such as the flash and ISO. I hate it when the camera decides to use the flash in a scene (such as under tree cover) with adequate light...) This is my "normal" mode.

And the Tv (manual time, auto aperture) and Av (manual aperture, auto time) are also pretty easy to use and useful in certain situations.

FWIW, the moon pic was shot in M (manual time and aperture). I simply tried various exposures and checked the display to choose an exposure that was ~1 stop below where I began to get some blown-out pixels. I chose a low ISO (100, it was a sunlit scene) for minimum noise and F8 for maximum lens resolution. The time came out to 1/200 sec. (The F16 at 1/ISO rule-of-thumb for sunlit scenes predicts 1/400 sec.) The camera is normally set to center-only autofocus and autofocused without difficulty as long as I kept the center sensor on the moon.


It is easy to focus on the hardware (and post-processing software), but the fanciest camera is no better than the human operating it:
http://www.kenrockwell.com/tech/notcamera.htm
http://www.kenrockwell.com/tech/howto.htm

Doug
 
Last edited:
Actually, my PowerShot A520 has the P, T, A, M, settings plus a whole slew of other ways to control the results and I use them all except P. (I mostly use A and M). But, whenever in doubt I always shoot* a couple in Auto mode - sometimes the camera really knows best.


*Real photographers say shoot instead of snap. :)
 
Top